Integrate with OwlPay Harbor's Stellar Anchor
For those who are new to integrating with Stellar Anchors, this article and the resources below will guide you through the entire integration process.
What you'll learn
- How to integrate with our Stellar Anchor.
- SEP-10: Secure authentication protocol to verify user identity.
- SEP-24: Standardized API for handling on- and off-ramp transactions.
Introduction
Applications seeking to integrate with Owlpay Harbor's Stellar Anchor must implement the client side of Stellar Ecosystem Proposal 24 (SEP-24). SEP-24 is a secure standardized protocol defined for applications to connect to businesses such as OwlPay Harbor. Such businesses that offer Stellar deposit & withdrawal services utilizing local payment rails are more generally called anchors. SEP-24 also encapsulates SEP-10, another protocol designed for authentication with the Anchor.
Key Features
- Bank Wire Deposits: OwlPay Harbor currently supports Bank Wire services for seamless fiat deposits.
- Stellar Network Support: Our service exclusively supports the Stellar Network, providing fast and secure transactions.
- Stellar Anchor Implementation: We have implemented the Stellar Anchor specifications, including SEP-10 and SEP-24.
Resources
- Stellar Wallet SDK Documentation : Leverage the Stellar Wallet SDK to simplify building your custom integration. Many of the code examples in this document are sourced directly from the Stellar Wallet SDK repository.
- Stellar Test Anchor TOML file : Before gaining access to OwlPay Harbor's test environment, you can utilize the SDF's test anchor while working on your integration development.
- Stellar Demo Wallet : This application provides a visual representation of the API calls required to integrate with a Stellar Anchor. (If your wallet service is not yet complete, you can use this tool to experience the interaction with OwlPay Harbor.)
- Stellar Ecosystem Proposal 24 (SEP-24) : A standardized API protocol for Stellar on- and off-ramps, implemented by OwlPay Harbor.
- Stellar Ecosystem Proposal 10 (SEP-10) : A standardized API protocol for Stellar authentication, implemented by OwlPay Harbor.
Assets
Before you get access to OwlPay Harbor, you should test your implementation with the SDF's Stellar Test Anchor. It implements the same APIs as OwlPay Harbor service but uses a different asset. The information for each asset is below.
Stellar Reference Token
This token is only on testnet.
Issuing Account: GCDNJUBQSX7AJWLJACMJ7I4BC3Z47BQUTMHEICZLE6MU4KQBRYG5JY6B
Asset Code: SRT
USD Coin
Testnet network (Test mode):
Issuing Account: GBBD47IF6LWK7P7MDEVSCWR7DPUWV3NY3DTQEVFL4NAT4AQH3ZLLFLA5
Asset Code: USDC
Public network (Live Mode):
Issuing Account: GA5ZSEJYB37JRC5AVCIA5MOP4RHTM335X2KGX3IHOJAPP5RE34K4KZVN
Asset Code: USDC
Application Flow
The integration process between a Wallet App, Wallet App Server, and OwlPay Harbor using Stellar SEP-10 for authentication and SEP-24 for handling on/off-ramp transactions.
Flow explanation
In order to proceed with any transactions, we must first authenticate with the Anchor (SEP-10).
Note: Harbor Anchor needs to be able to verify the identity of the wallet originating the request so we must addclient_domain, or authentication will fail.
Authentication SEP-10:
Let's imagine the workflow for a wallet app. It should proceed as follows:
-
Request Challenge Transaction:
- When the user interacts with the wallet app and signs into their Stellar Account, the wallet server will request a challenge transaction,
/WEB_AUTH_ENDPOINT.
- When the user interacts with the wallet app and signs into their Stellar Account, the wallet server will request a challenge transaction,
-
Client Signs Challenge Transaction:
- The wallet server receives an anchor-signed challenge transaction from Harbor and returns it to the wallet app to be signed by the client-side.
- After the client-side signs the challenge transaction, it is returned to the backend to be signed by the wallet server or
client_domain.
-
Wallet Server Signs Challenge Transaction:
- Finally, the backend adds the
client-domainsignature and we now have a total of three signatures, to be returned to the Anchor server in exchange for a JWT. - This JWT is to be used in the header
Authorization: Bearer dvoiwen3DF...of subsequent API requests.
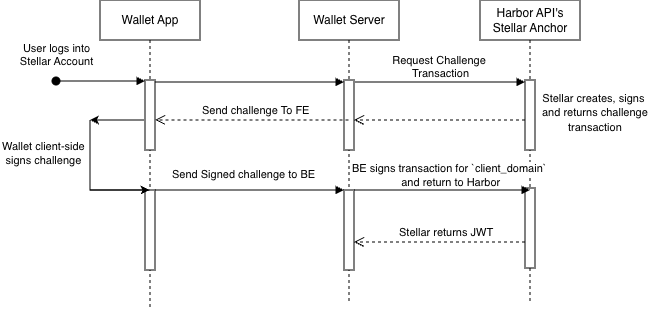
Harbor's Anchor SEP-10 Authentication Flow
- Finally, the backend adds the
Deposit SEP-24 (on-ramp):
The deposit flow can only be fulfilled if the Stellar account has established a trust line for the given asset.
- User initiates Deposit
- When the user initiates a transfer the wallet server calls harbor anchor's
/transactions/deposit/interactive.
- When the user initiates a transfer the wallet server calls harbor anchor's
- Harbor's Anchor provides transfer URL
- The anchor returns a SEP-24 URL which the Wallet App may open to complete the deposit through a Harbor UI.
- Bank Wire Funding Account
- For regulatory purposes, you must first pass a KYC verification also provided through this link. After doing so users can obtain our Bank Wire Funding Account to make the deposit. If you want to withdraw money, you need to take the following additional steps.
Withdrawal SEP-24 (off-ramp):
-
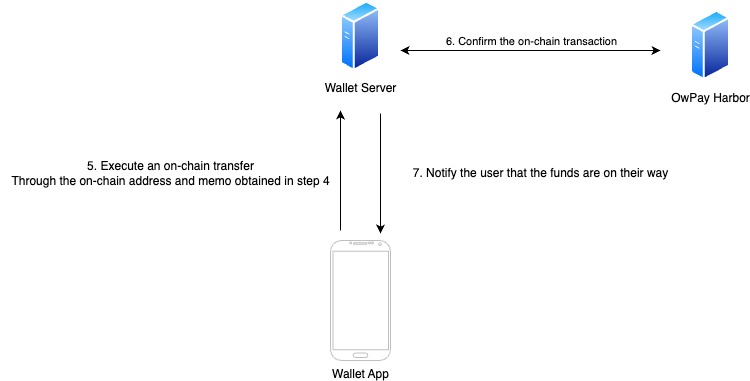
Diagram Explanation: Integration with OwlPay Harbor for withdraw flow
-
Execute an On-Chain Transfer:
- Likewise, the Wallet App initiates an on-chain transfer by calling
transactions/withdrawal/interactive - User will provide a beneficiary bank account where they wish the off-ramped funds to be deposited.
- The Anchor will return an off-ramp Wallet address where you can send the funds for processing.
- Likewise, the Wallet App initiates an on-chain transfer by calling
-
Confirm the On-Chain Transaction:
- The Wallet Server verifies that the on-chain transaction has been successfully processed by OwlPay Harbor.
- This step ensures the transfer is complete and acknowledged.
- Once the funds are confirmed in the withdrawal address, the beneficiary will receive the equivalent amount in fiat currency deposited into their account within a few days.
-
Notify the User:
- In the case that you are not the end user, be aware that it is your responsibility to update them on the status and changes of this transaction. This can be done by calling the GET
/transactionand passing thetransaction_idto the anchor SEP-24 endpoint:
// Call /transaction endpoint (authenticated with JWT) const response = await axios.get(`${transferServer}/transaction`, { params: { id: id }, headers: { Authorization: `Bearer ${req.jwtToken}`, }, });- Once the transaction is confirmed, the Wallet App should notify the user that the funds are on their way. This is because after we have sent the funds the beneficiary account provided, we have no way to know exactly how long it will take or how the receiving bank will notify the beneficiary.
- This provides the user with confirmation and updates them on the progress of their withdrawal.
- In the case that you are not the end user, be aware that it is your responsibility to update them on the status and changes of this transaction. This can be done by calling the GET
Statuses
Throughout the life cycle of a transaction, there are many possible different statuses. Be sure poll the SEP-24 status endpoint any time you need to see the latest updates.
| Status | Description |
|---|---|
incomplete | There is not yet enough information for this transaction to be initiated. Perhaps the user has not yet entered necessary info in an interactive flow. |
pending_user_transfer_start | The user has not yet initiated their transfer to the anchor. This is the next necessary step in any deposit or withdrawal flow after transitioning from incomplete. |
pending_user_transfer_complete | The Stellar payment has been successfully received by the anchor and the off-chain funds are available for the customer to pick up. Only used for withdrawal transactions. |
pending_external | Deposit/withdrawal has been submitted to external network, but is not yet confirmed. Waiting on Bitcoin or other external crypto network, or a bank transfer, to complete. |
pending_anchor | Deposit/withdrawal is being processed internally by anchor. This can also be used when the anchor must verify KYC information prior to deposit/withdrawal. |
on_hold | Deposit/withdrawal is currently on hold for additional checks after receiving user's funds. Used for compliance reviews or similar checks. Once cleared, the transaction resumes. |
pending_stellar | Deposit/withdrawal operation has been submitted to Stellar network, but is not yet confirmed. |
pending_trust | The user must add a trustline for the asset for the deposit to complete. |
pending_user | The user must take additional action before the deposit/withdrawal can complete, for example an email or 2FA confirmation of a withdrawal. |
completed | Deposit/withdrawal fully completed. |
refunded | The deposit/withdrawal is fully refunded. |
expired | Funds were never received by the anchor, and the transaction is considered abandoned by the user. Anchors may use this status if a SEP-38 quote expires or set custom expiration. |
no_market | Could not complete deposit because no satisfactory asset/XLM market was available to create the account. |
too_small | Deposit/withdrawal size less than min_amount. |
too_large | Deposit/withdrawal size exceeded max_amount. |
error | Catch-all for any error not enumerated above. |
The status change flow is as follows
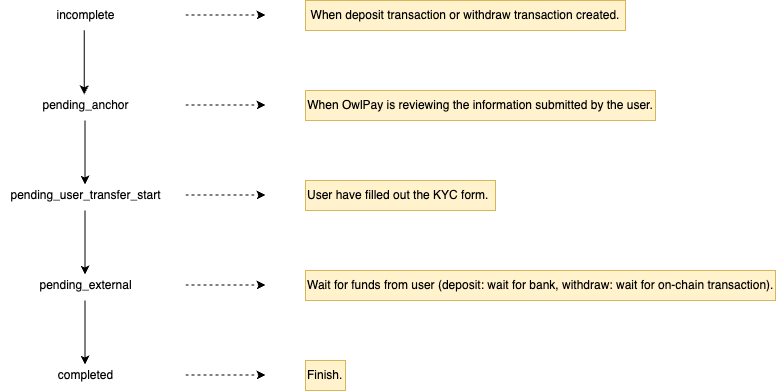
The application side should handle deposit(on-ramp) and withdrawal(off-ramp) status updates.
Important Notes for Withdraw (Off-Ramp):
-
Provide On-Chain Transfer Information
- When the status changes to
pending_user_transfer_start, you need to provide the user with the necessary on-chain transfer information. - Ensure the user does not incorrectly input the address.
- The most robust approach is for the application to pre-fill the relevant parameters, requiring the user to simply review, sign, and confirm the transaction.
- When the status changes to
-
Temporary pending_anchor State
- There may be a brief period where the transaction remains in the
pending_anchorstate. - During this phase, OwlPay Harbor performs customer due diligence (KYC/AML checks) for each transaction.
- There may be a brief period where the transaction remains in the
Let’s get started
Installing the Wallet or other Client SDKs
The docs on stellar sdks are quite scattered and implementations may vary based on your needs. So we recommend exploring your options and finding what fits for your particular case. We'll just two possibilities here, starting with @stellar/typescript-wallet-sdk.
You can use yarn to install it:
$ yarn add @stellar/typescript-wallet-sdkAuthenticate
import { Wallet, SigningKeypair } from "@stellar/typescript-wallet-sdk";

const wallet = Wallet.TestNet();

// Testnet
const WP_ACCESS_HOST = "anchor-stage.owlpay.com";
// Pubnet
// const WP_ACCESS_HOST = "anchor.owlpay.com";

// First we create an anchor object with OwlPay Harbor home domain.
const anchor = wallet.anchor({ homeDomain: WP_ACCESS_HOST });

// Then we create the sep10 object which handles all the athentication steps.
const sep10 = await anchor.sep10();

// Finally, we authenticate using the wallet's SIGNING_KEY secret.
const authKey = SigningKeypair.fromSecret(AUTH_SECRET_KEY);
const authToken = await sep10.authenticate({ accountKp: authKey });
Initiate a Transaction
const assetCode = "USDC";
const info = await anchor.getInfo();
const currency = info.currencies.find(({ code }) => code === assetCode);
if (!currency?.code || !currency?.issuer) {
  throw new Error(
    `Anchor does not support ${assetCode} asset or is not correctly configured on TOML file`,
  );
}

// withdraw case
// Use same "anchor" object from previous step.
const { url, id } = await anchor.sep24().withdraw({
  assetCode: assetCode,
  authToken: authToken, // Use same "authToken" string from previous step
  lang: "en", // "lang" is optional, we currently only support en
  withdrawalAccount: FUNDS_STELLAR_KEYPAIR.public_key,
  extraFields: {
    // "amount" is optional for non-custodial wallets and mandatory for custodial wallets
    amount: "<amount to withdraw / cash-out>",
  },
});

// deposit case
// Use same "anchor" object from previous step.
const { url, id } = await anchor.sep24().deposit({
  assetCode: assetCode,
  authToken: authToken, // Use same "authToken" string from previous step
  lang: "en", // "lang" is optional, we currently only support en
  destinationAccount: FUNDS_STELLAR_KEYPAIR.public_key,
  extraFields: {
    // "amount" is optional for non-custodial wallets and mandatory for custodial wallets
    amount: "<amount to withdraw / cash-out>",
  },
});
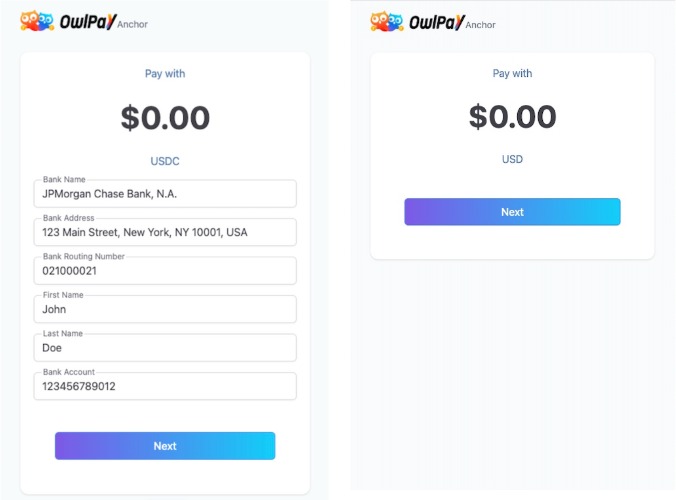
After successfully getting the URL, the webpage content will look like this:
Binding transaction status has changed
When a user completes a transaction on the interface provided by OwlPay Harbor, the transaction status is updated by OwlPay Harbor. To retrieve the latest status, the application must perform polling to check for updates.
// While the Watcher class offers powerful tracking capabilities, sometimes
// it's required to just fetch a transaction (or transactions) once. The Anchor
// class allows you to fetch a transaction by ID, Stellar transaction ID, or
// external transaction ID like illustrated below.

// "id" is the actual Anchor transaction id, all transactions should have it.
const transaction = await anchor.sep24().getTransactionBy({
  authToken,
  id: transactionId,
});

// "stellarTransactionId" (aka "stellar_transaction_id" on the SEP spec)
// is the hash of the Stellar network transaction payment related to this
// Anchor transaction.
// The "stellarTransactionId" has a SHA256 hash format like the below:
// - "a35135d8ed4b29b66d821444f6760f8ca1e77bea1fb49541bebeb2c3d844364a"
// E.g. we'll only have this transaction id field AFTER the wallet sends funds
// to Anchor on the withdrawal flow or receives funds from Anchor on the
// deposit flow.
const transaction = await anchor.sep24().getTransactionBy({
  authToken,
  stellarTransactionId,
});

// "externalTransactionId" (aka "external_transaction_id" on the SEP spec)
// could refer to some ID of transaction on external network.
// E.g. for MoneyGram this is the "reference number" displayed to the user on
// the last step of MoneyGram's UI which the user should then use on a physical
// MoneyGram location to complete the cash out operation and pick-up the money.
const transaction = await anchor.sep24().getTransactionBy({
  authToken,
  externalTransactionId,
Other Client SDK Examples
Alternatively, we'll show some snippets implemented code from @stellar/stellar-sdk , but please check out stellar-sdk docs for more details. Wether client-side or server-side, you may need to be signing transactions in you workflow. This code only shows Keypair and Transaction classes, but be aware that there is much more!
Installation:
$ npm install --save @stellar/stellar-sdk// Parse the Transaction
const txn = new StellarSdk.Transaction(challengeTx.transaction, network);
//Sign the Transaction
const keypair = StellarSdk.Keypair.fromSecret(secretKey);
txn.sign(keypair);
//Return to XDR format to be sent over the wire
const signedTransaction = txn.toEnvelope().toXDR('base64');Summary
By following these guidelines, you can ensure a seamless and secure experience for your customers during the deposit and withdrawal processes.